The best thing about making food yourself is that you can make it any way you would like. I won’t pretend to be a french pastry expert but I was able to make mini and large macaroon. The mini ones were smaller than a quarter and made pretty good bite sized snacks while the large ones were almost the size of my hand and though were not the easiest to eat were interesting at the very least. I had them in the oven for just a bit too long so they did start to brown a bit but taste was not affected.
Pulling once again from a particularly favourite movie of mine a breakfast favourite of mine is eggy in a basket which is a fried egg and toast 2 in 1. Its easy to make quite literally only requiring bread and an egg but requires some practice to ensure that bread is toasted and egg is cooked. My trick for this is frying up the bread for ~1min before cracking the egg in so that everything cooks at the same time.
I feel like ramen is a min/max dish where either it takes 2 minutes or 2 days. I recently got my hands on some miso paste and decided to take a crack and homemade ramen.
I started of with making a dashi which I can only explain as an umami bomb using bonito flakes and kombu. The broth I made from chicken bones and vegetable scraps (typical broth). I also trialled soy soaked eggs which I soft boiled to the exact point where the yolks were still perfectly runny (I clearly could have let them soak for a bit longer) and added some shiitake mushrooms. As can be seen in the picture I also added a lot of green onions (and may have overdone it) which is a personal favourite of mine and you can never have enough.
I have a particular love for chanterelle mushrooms but unfortunately they are very hard to come by here in Canada. Not much to note but they make a phenomenal cream of mushroom sauce and a few slices of parmigiano reggiano as garnish tie it all together.
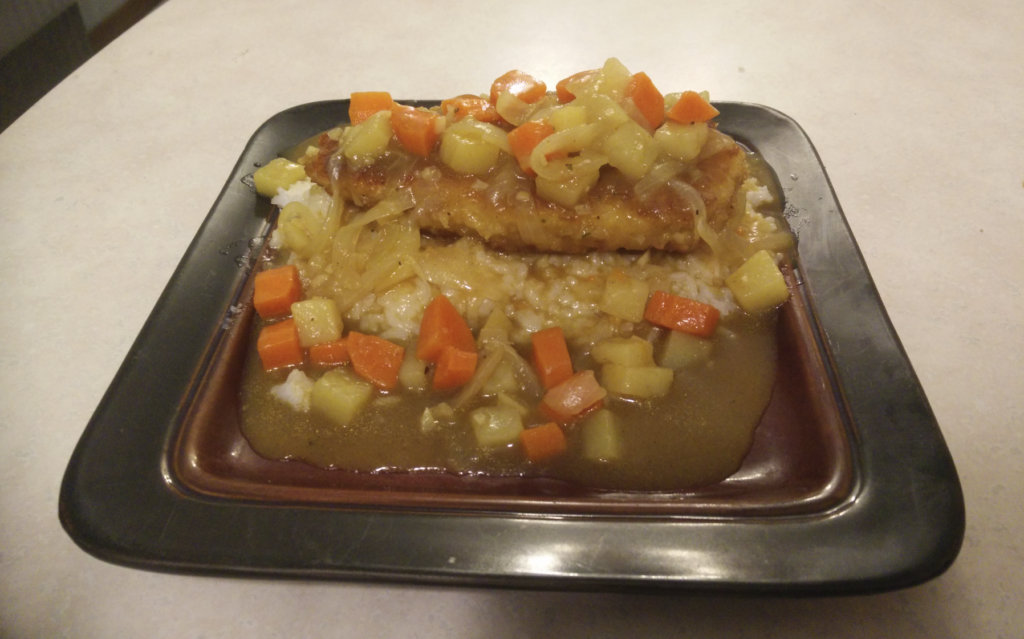
I was initially introduced to this dish while working at Toyota where this was available once a week for lunch and quickly fell in love with it. It is a very filling, tasty and balanced dish that is one of the great comfort foods. It is not a typical curry with a much sweeter flavour (not to say that it is sweet) and the potatoes and carrots are also a unique addition but this truly is an amazing dish.
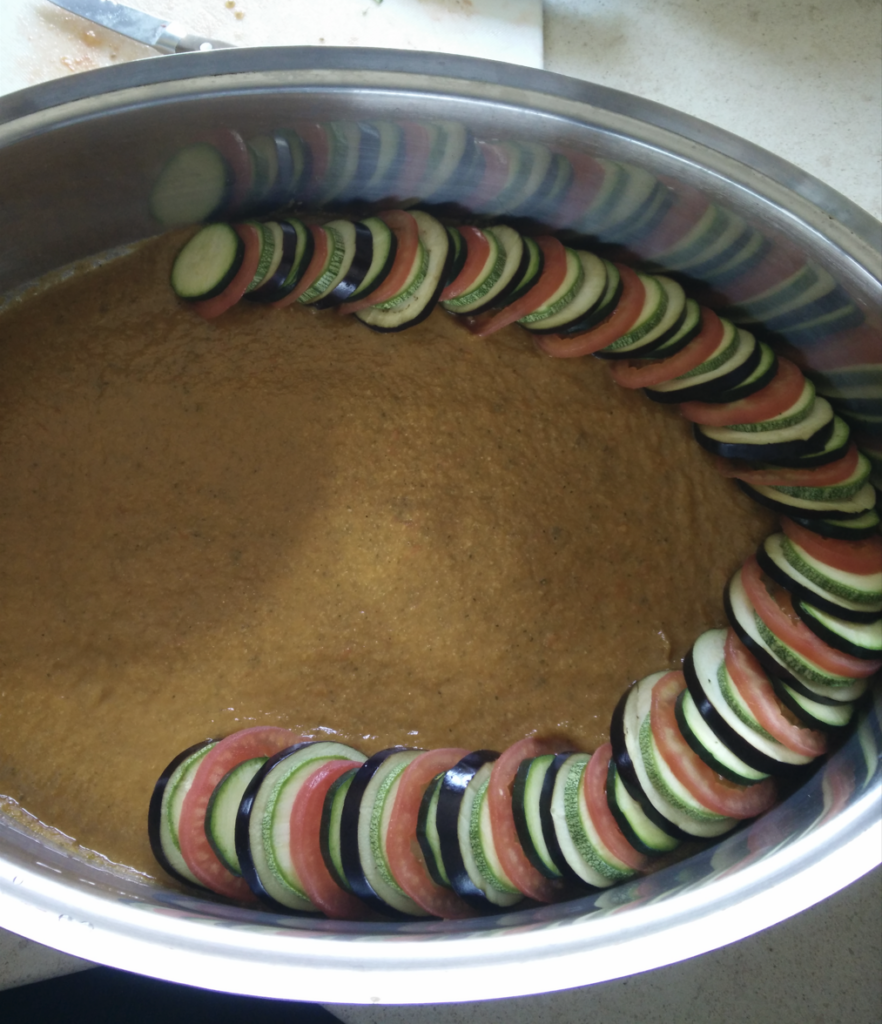
Obviously drawing inspiration from the Pixar movie this was a fun recipe that is great for larger celebrations (Easter/Christmas). It is heavily important to ensure that all vegetables are of uniform size which is much easier said then done as finding zucchini, eggplant, tomatoes all in the same size can be difficult. It requires a bit of prep-work but once prepared can be easily baked while working on other things. I have trialled 2 versions, one classic with the typical vegetable and the other an improved modified version with a mix of alternating potatoes and bacon which add a nice taste to the vegetables (bacon>vegetables). To ensure size consistency I slice the vegetables on a mandolin but sometimes have to go by hand.
The B-52 shot is a very aesthetically pleasing shot with 3 clearly separated layers and a good taste. This shot leverages the relative densities of all the ingredients to ensure that they can stay separated. I make my modified B-52 (from bottom to top) with coffee liqueur, Baileys and heavy cream. The trick to ensuring all of the layers stay separate is to pour them over a barspoon so that inertia doesn’t mix it all up.
Apple pie is a classic and I don’t really have much to say other than the presentation matters and my personal favourite is an interlaced lattice. It provides a good structure, looks nice and is relatively easy and simple to make. Additionally for the crust I always use either vodka or 95% spirit with all ingredients chilled in the freezer to ensure that the crust stays flaky.
Baklava is a very labour intensive treat but well worth the invested time. I have tried it both with store bought and home made phyllo and can 100% confirm that store bought it much better both in taste and the time saved. I tend to make mine on a bit more of Turkish side rather than Greek adding a bit of rose water.
Finished ProductMis En PlaceAlternating layering of phyllo and nuts Cutting to size and dusting
I have been playing around with automatic aquarium feeders for close to 5 years now and have finally had a chance to make my own custom feeder designed specifically for the Fluval flex tank. It has been a fun journey where I was able to practice everything from soldering, 3D design to software development.
To Start
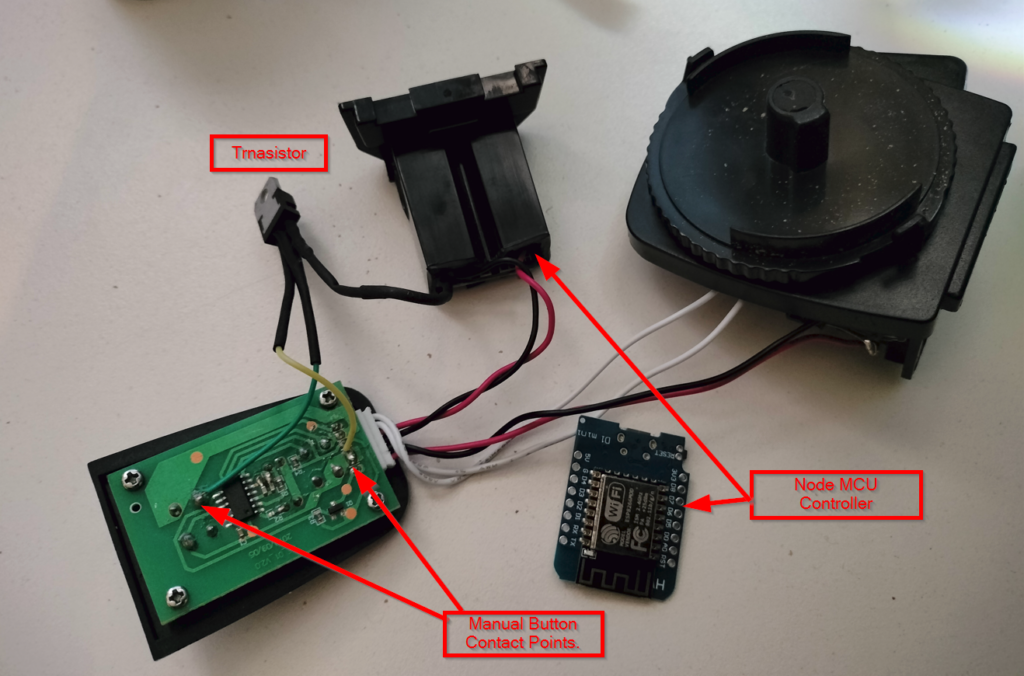
I started off with an off the shelf “dumb” feeder that is battery powered and has a automatic feeding function every 12 or 24 hours. This won’t do for me as I like fine grained control and batteries have a habit of failing at the worse time.
To solve this I used one of my 5$ NodeMCU controllers so I can 1) have this powered over USB, 2) set custom feeding programs and 3) to be able to control this over the internet.
For the power I simply soldered the 3V power from the NodeMCU into the automatic feeder and it worked without a problem as there was already a power conversion circuit on the feeder. As for the button that was a bit more fun.
Using a multi meter (in diode mode) I reviewed the switch contact pins that would cause the feeder to start a feeding cycle. I then soldered a transistor across these pins so that when I turn the transistor on I can simulate the physical button being pressed and start my own feed cycle. This way I still have all of the original functions of the feeder (most importantly position sensing so it returns to the correct position) but I now have full control over its use.
The last part of this was writing code for the NodeMCU controller which was a bit complex as I decided to implement the option to do multiple feed cycles and track last fed time so I can setup alerts for any feeding errors. For the multiple feed cycles I created an API for the controller that can take any number of feed cycles based on URL get parameters. For example in the URL below I have feed_cycles=1 so it would do 1 cycle but I can equivalently set this to 2 or 10. Additionally I set a hard coded password in the API so it is not accidentally accessed. This is all on an internal network that has no open access to the outside world so should not be a problem.
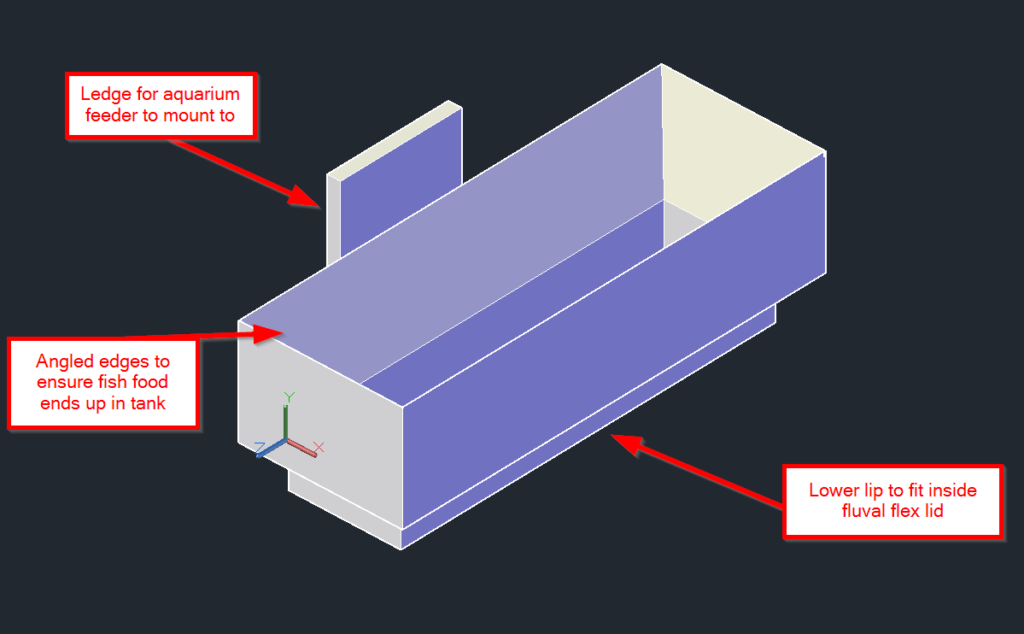
Now that the brains and function were all setup I set on figuring out how to actually mount it. As I have the Fluval flex aquarium that come with a lid there aren’t any standard automatic feeders that would fit so I knew I had to make my own 3D design.
I am definitely not an expert in 3D CAD design but as a certified “Jack of all trades” I know enough to get me by. I went through 5 revisions to get all of the sizing correct and in the end had a functional product. The 3 main features are a lower lip that is sized to fit in my tank’s lid, a ledge for the aquarium feeder to mount to and angled edges to ensure fish food ends in the tank.
I printed all of these on my faithful Elegoo Mars and within 3 hours had a functional product.
Summary
In summary this was a fun multi disciplinary project that allowed me to make something that doesn’t exist on the market.
Reasons why my feeder is better:
USB Powerered
Wifi Enabled
Custom Feeding Schedules
Alert Emails On Missed Feeding Schedules
Control Over How Many Feed Cycles per Feeding
Fits On The Fluval Flex
Mess Free (the flakes in the picture are there because I spilled some during the mounting process)
Home Made With Love
Additional notes: part of the reason why I went through all of this effort was due to wanting a tank with a lid on it. Living in the KW region I have very hard water and an opened tank looses to much water to evaporation leading to unseemly calcium buildup. A lidded tank reduces evaporation and enables a generally more easier life. Additionally next steps include weighing an average feeding cycle to understand the distribution and then start feeding my fish based on their weight.